Manchego and Thyme Popovers

 
Popovers_v2_01.jpg

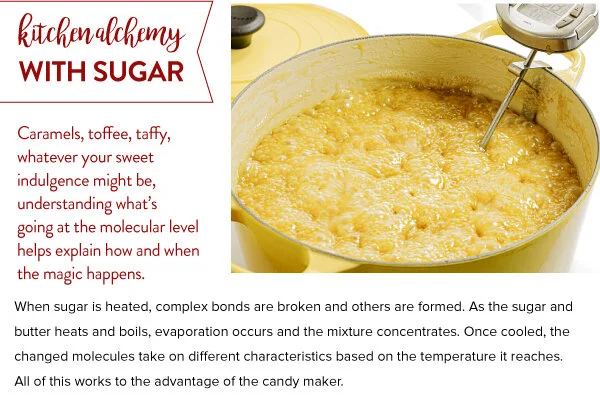
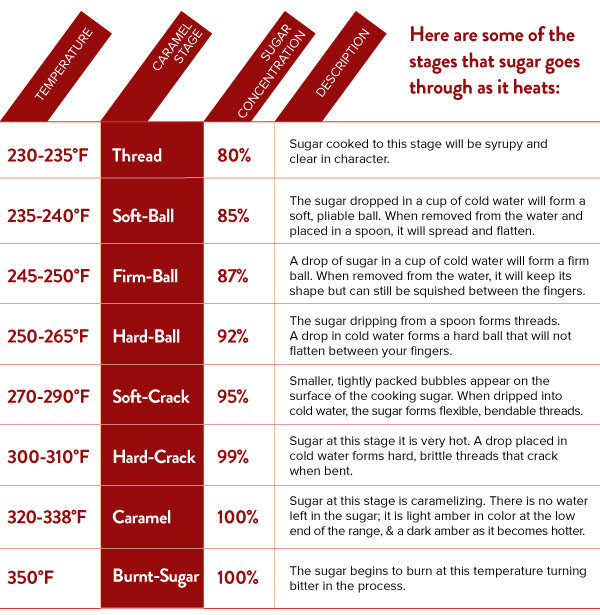
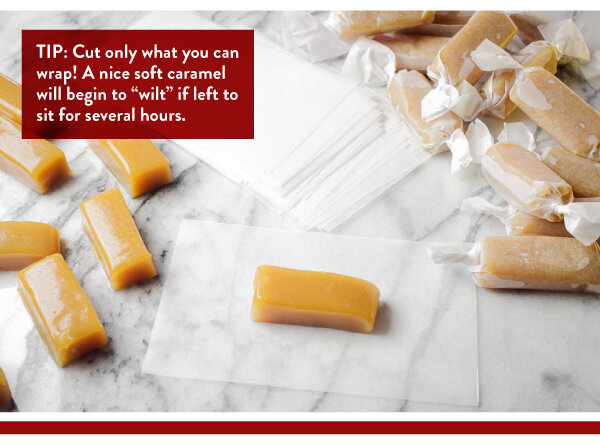
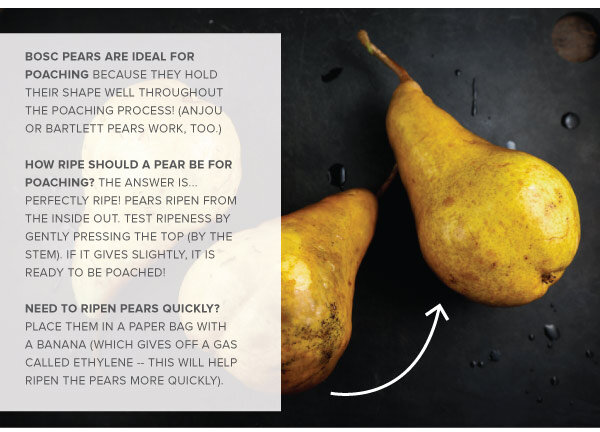
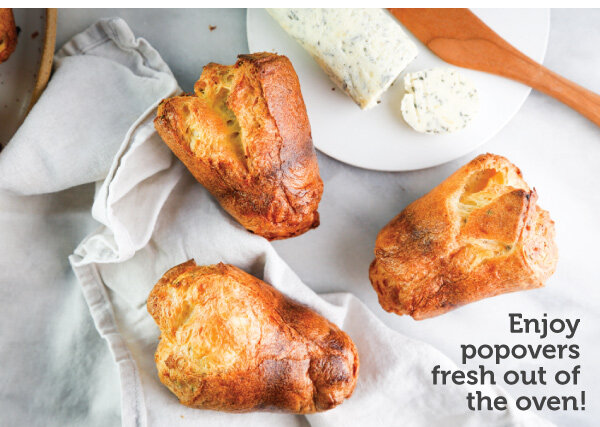
Popovers are impressive, high-rising rolls with a soft, airy inside and a crispy, crunchy exterior. These delectable morsels are meant to be enjoyed freshly baked straight out of the oven. IN THIS ISSUE, we feature Manchego and Thyme Popovers with an Herb Butter that would be enjoyably delicious as a savory breakfast, or as a side at lunch or dinner! 

Manchego and Thyme Popovers with Herb Butter
Makes 12 popovers

Popover Ingredients:
1-1/2 cups all purpose flour
1 teaspoon Kosher salt
1/2 teaspoon fresh ground black pepper
1 tablespoon fresh thyme, finely chopped
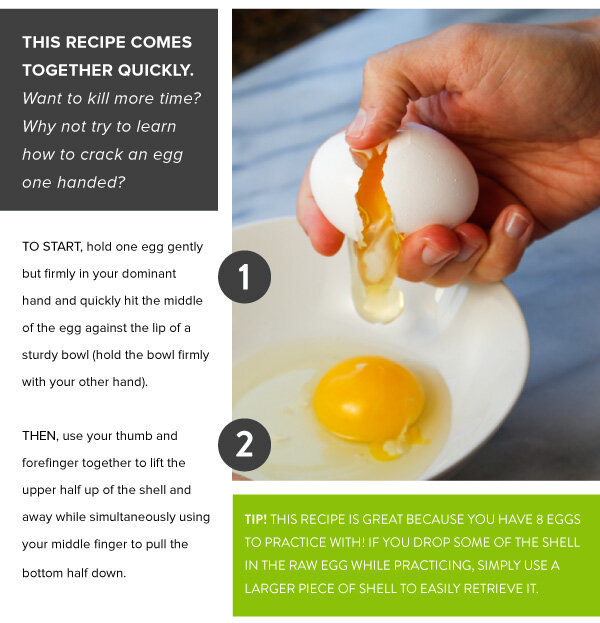
4 large eggs, room temperature
1-1/2 cups whole milk, room temperature
1/2 cup Manchego cheese, finely grated
2 tablespoons unsalted butter, melted (for greasing the popover pan)

Herb Butter Ingredients - makes 1/2 cup
1/2 cup (I stick) unsalted butter, softened to room temperature
1 garlic clove, minced
1 tablespoon fresh sage, finely chopped
1 tablespoon fresh rosemary, finely chopped
1/4 teaspoon Kosher saltPopover

Directions:
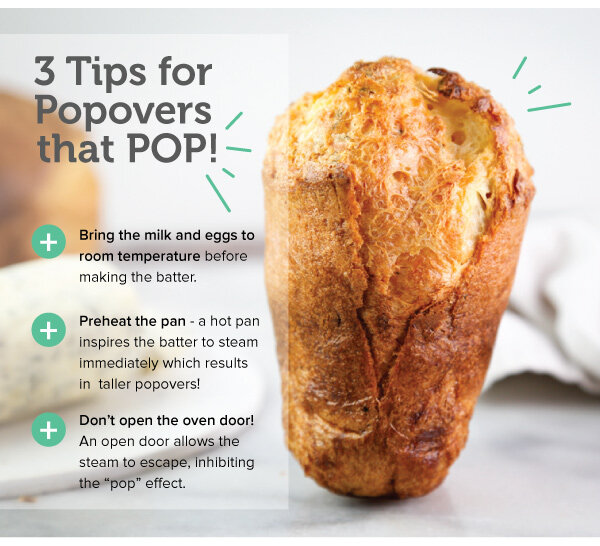
1. Preheat the oven to 450°F. Place the empty pan in the oven while it preheats. 

2. In a medium bowl, combine the flour, salt, and pepper and mix with a fork for about 30 seconds to incorporate evenly. Add the thyme and continue mixing until evenly distributed.

3. In a large bowl, whisk the eggs and whole milk together until contents are frothy, about 5 minutes.

4. Slowly add the flour mixture to the egg mixture and continue whisking until all the ingredients are combined and the batter is the consistency of thick cream. (Try not to over whisk!) Stir in the cheese.

5. Remove the preheated popover or mun pan from the oven and brush the cups with the melted butter. Fill the cups 3/4 full with the batter. Bake the popovers on the lowest rack for 20 minutes. After 20 minutes, reduce the temperature to 350°F, ensuring the oven door stays closed so no steam escapes (this is crucial to getting the pop effect!). Continue to bake for another 20 minutes, or until golden brown.

6. Remove popovers from the oven and serve hot with herb butter. If not serving right away, remove popovers from the pan and cool on a wire rack immediately to keep that delightful crunch!

Herb Butter Directions:
1. In a small bowl, combine all of the ingredients together and mix with a fork or a hand mixer until the herbs and garlic are distributed evenly. 

2. Transfer the butter onto a sheet of plastic wrap and roll into a cylinder. Twist the ends of the plastic wrap tightly and refrigerate for at least one hour until cold and solid.

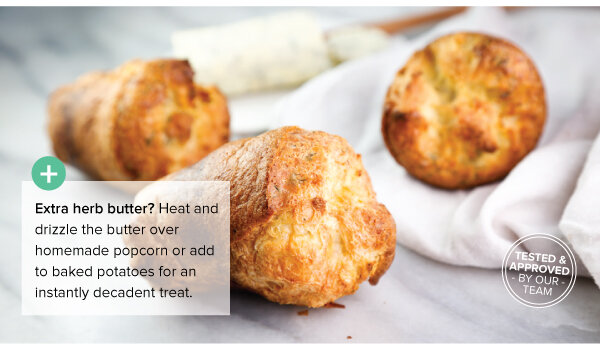
3. Serve herb butter alongside warm popovers in a small dish. Butter is best when enjoyed within 1 week, but can be frozen for up to two months. To freeze, simply wrap the plastic wrapped butter in parchment paper and freeze in a freezer bag, removing excess air. Extra herb butter? Heat and drizzle butter over homemade popcorn or add to baked potatoes.


Winter Bowls

 
WinterBowl2021_v2_01.jpg

The season for healthier dinners has arrived! Each January inspires a renewed energy and recommitment to healthier habits. Winter grain bowls are a delicious way to achieve those goals! This tasty bowl features baked tofu with quinoa, roasted beets, and arugula all dressed with a flavorful turmeric tahini dressing.

Winter Grain Power Bowls Makes 4 large bowls

Winter Grain Bowl Ingredients:
1 block extra firm tofu 1 large purple beet (or two small beets), peeled & diced into 1/2" cubes
1 large golden beet (or two small beets), peeled & diced into 1/2" cubes
1 fennel bulb, stalks removed, cored, and thinly shaved
3 tablespoons olive oil, divided
1/2 teaspoon salt, divided
1/4 teaspoon pepper, divided
1 cup quinoa
2 cups vegetable stock
1 tablespoon cornstarch
1 red onion, thinly sliced with a mandoline
1 large carrot, shaved and rolled
4 cups arugula
1/3 cup shelled pistachios
Fresh mint leaves, torn for garnish

Turmeric Tahini Dressing Ingredients:
3 tablespoons olive oil
1/4 cup tahini
1 teaspoon fresh ginger, minced
2 tablespoons fresh lemon juice (about 1 large lemon)
2 tablespoons water (as needed, to thin)
1/4 teaspoon of kosher salt
1/4 teaspoon cayenne pepper
1/2 teaspoon turmeric
1 clove garlic, minced

Directions:
1. Prepare the tofu by slicing it into 1" thick slices. Lay the slices on a paper towel-lined baking sheet, then cover the tofu with another layer of paper towels. Place a cutting board on top of the covered slices to press out the excess water from the tofu. (Place a cookbook or a heavy pot on top of the cutting board to help apply weight and pressure so that extra water is forced out of the tofu. This pressing and draining step will help the tofu achieve a better texture when baking.) Press and drain the tofu slices for about 20-30 minutes.

2. Preheat the oven to 400°F. In two separate bowls, prepare the beets and fennel. Toss the diced beets with 1 tablespoon olive oil, 1/8 teaspoon salt, and 1/8 teaspoon pepper. Toss the shaved fennel with 1 tablespoon olive oil, 1/8 teaspoon salt, and 1/8 teaspoon pepper. Place the prepared beets and fennel in a large roasting pan and roast for 15 minutes or until the fennel starts to turn golden brown. Remove the fennel and continue roasting the beets for another 15 minutes, or until the beets are fork tender.

3. Meanwhile, prepare the quinoa on the stovetop using a 2:1 liquid-to-grain ratio. Bring the vegetable stock to a boil and add the quinoa. Stir, cover, and turn down the heat to low. Check after 15 minutes to see if the quinoa is tender, or if more liquid is needed to finish cooking. The small kernels expand as they soak up the cooking liquid. When tender and ready, you’ll see a tiny curlicue emerge; this is the beginning of a quinoa sprout, (and a sign of doneness.) Remove from the heat when done.

4. After the tofu has drained, remove the weights and paper towels and cut the tofu slices into 1" cubes. Gently toss the tofu cubes with 1 tablespoon olive oil, 1/4 teaspoon salt, and 1 tablespoon cornstarch until evenly coated. Spread the tofu cubes across a lined baking sheet and bake in the oven at 400°F for 30 minutes. Half way through baking, turn the tofu pieces. Bake until the tofu is baked and crisped on all sides.

5. Prepare the turmeric tahini dressing by whisking all of ingredients together until the dressing is combined.

6. Thinly slice the red onion using a mandoline. Shave the carrot into ribbons using a vegetable peeler. Tear the mint leaves for a garnish.

7. Once all of the ingredients are prepared, assemble the bowls. Add a scoop of cooked quinoa to each bowl, then add the roasted beets, roasted fennel, and baked tofu. Continue building the bowl by adding a few slices of red onion, a few ribbons of carrot, and a handful of arugula. Drizzle the bowl with the dressing and then garnish with pistachios and fresh mint leaves.


Shrimp Cocktail & Gin Martinis


Even if you’re having a solo party this New Year’s Eve, you still deserve to celebrate the fact that 2020 is almost behind us -- and what a year it has been! IN THIS ISSUE we welcome 2021 with perfectly poached shrimp cocktails and ice cold gin martinis. Bottoms up . . . and ONWARD!

Classic Shrimp Cocktail and Gin Martinis

Shrimp Ingredients: (Serves 4)
24 large, 21-25 count deveined shrimp (keep tail intact)
2 lemons, 1 juiced and 1 cut into wedges
1 small onion, cut into wedges
3 cloves garlic, smashed
1 stalk celery cut into large pieces
2 bay leaves
1 teaspoon Kosher salt
1 teaspoon sugar
1 teaspoon peppercorns

For Garnishing:
Several sprigs of Italian parsley
1 lemon, cut into wedges

Homemade Cocktail Sauce Ingredients:
3/4 cup ketchup
2 tablespoons prepared horseradish
1/4 teaspoon salt
1/2 teaspoon Worcestershire sauce
1 teaspoon lemon juice
1/2 teaspoon Tabasco sauce (optional)
1/4 teaspoon celery salt

Classic Gin Martini: (Serves 1)
3 oz. gin (chilled in the freezer)
1/2 oz. dry vermouth (chilled in the refrigerator

Garnish:
3 pimento-stuffed olives or lemon twist

Shrimp Cocktail Directions:
1. Combine lemon wedges, lemon juice, onion, garlic, celery, and bay leaves in a large pot filled 3/4 full with water. Bring the water to a boil and add the salt, sugar, and peppercorns. Once the water comes to a rolling boil, remove the pot from heat. Add the shrimp to the hot water and cover with a lid. Let the shrimp cook in the hot water for 5-8 minutes until shrimp are pink and opaque. 

2. While the shrimp are poaching, fill a large bowl with ice and water. Once shrimp are cooked, remove from the hot water by straining in a colander; discard the remaining contents. Plunge the shrimp into the ice and water and let them chill completely. Drain and serve immediately, or chill in the refrigerator for up to 12 hours.

3. While the shrimp are chilling, make the cocktail sauce by combining the cocktail sauce ingredients in a small bowl or wide-mouthed glass.

4. Serve the shrimp in glasses for individual servings, or on a large platter for serving a small group. Garnish with fresh lemon wedges and sprigs of parsley leaves.

Classic Gin Martini Directions:
1. Place martini glasses in the freezer to chill.

2. Meanwhile, combine gin and vermouth in a mixing glass full of ice. Stir for 30 seconds.

3. Strain into a chilled martini or coupe glass and garnish with olives or a lemon twist. Enjoy immediately!


Winter Pear Galette


Warm, spicy pears are our winter season indulgence, and we couldn’t be happier about it! In this recipe, we share our simple go-to pastry crust that comes together quickly for this impressive dessert. The warm cinnamon-y pears and flaky crust topped with cold, vanilla bean ice cream completes any occasion in sweet style.

Winter Pear Galette
Serves 4

Filling Ingredients:
3 Asian pears, cored and cut into thin 1/8" slices using a mandoline
3 tablespoons brown sugar
1 teaspoon pure vanilla extract
2 teaspoons finely grated lemon peel
1 teaspoon lemon juice
1/2 teaspoon cinnamon
1/4 teaspoon nutmeg
1/4 teaspoon ginger
1/4 teaspoon Kosher salt
2 tablespoons unsalted butter, chilled and cut into small pieces
1/4 cup slivered almonds
1/3 cup honey (for drizzling)

Crust Ingredients:
2-1/2 cups all-purpose flour
1 tablespoon sugar
1-1/2 teaspoons Kosher salt
1 cup unsalted butter (2 sticks), grated and well chilled
4-6 tablespoons ice water

Crust Topping:
1 egg, whisked for egg wash
1 tablespoon coarse sugar

For Serving:
Vanilla Ice cream
Sprinkle of cinnamon
1/4 cup slivered almonds, optional
1/3 cup honey for drizzling, optional

Directions:
(The crust may be mixed by hand or with a food processor. )
1. For the crust, mix the flour, sugar, and salt together in a large bowl with a whisk until evenly distributed.

2. Prepare the ice water by filling a small bowl with ice cubes and adding water.

3. Place the grated butter in the flour mixture. Using a pastry blender, cut the butter and flour mixture together until a coarse texture is reached with some pea-sized pieces of butter remaining.

4. Add 2 tablespoons of the ice water by sprinkling on top of the flour/butter mixture. With a fork, gently toss the mixture. Continue adding ice water one tablespoon at a time tossing after each addition until a rough ball of dough forms. (Avoid adding too much water.)

5. Flatten the dough ball into a disk about a one-inch thick, and wrap in plastic wrap.

6. Chill the wrapped dough disk for an hour or overnight.

7. On a pastry slab or a cutting board, divide the dough into two even balls. Place the first half of the dough directly on a sheet of parchment paper and roll into a rough square, about 1/8-inch-thick. Create a straight edge by folding 1” of the dough onto itself around the perimeter. Chill for 15 minutes. While the first half is chilling, prepare the second half of dough into a square, as well, chill.

8. Preheat the oven to 425° F.

9. Meanwhile, prepare the filling. In a large bowl, mix the pear slices with the brown sugar, vanilla, lemon peel, lemon juice, cinnamon, nutmeg, ginger, and salt. Toss until evenly coated.

10. Assemble the galettes. Group pear slices together, and carefully arrange overlapping the slices.

11. Distribute the butter pieces evenly on the pears and use a pastry brush to brush the crust with the lightly beaten egg. Sprinkle the coarse sugar on top of the crust.

12. Bake for about 30 minutes, or until the crust lightly browns. Serve with vanilla ice cream and a sprinkling of cinnamon while still slightly warm.


Green Chile & Cheese Egg Bake Bites


Holiday preparations are in full swing, and that means busier mornings and weekends.  We find ourselves searching for protein-packed recipes that come together in a snap. These featured savory egg bake bites are just that! IN THIS ISSUE we share our favorite recipe for petite-sized breakfast bites, along with tips on how to crack an egg one-handed. 

Green Chile & Cheese Egg Bake Bites
Makes 12 egg bites

Busy mornings are the norm! We often find ourselves searching for satisfying, protein-packed recipes that come together in a snap to help us approach the day with some solid nourishment. You’ll find that these savory egg bake bites are just that -- delicious, satisfying, and easy!

Ingredients:
1/2 cup butter, melted, plus 2 tablespoons softened
1/4 cup flour
1/2 teaspoon baking powder
1/4 teaspoon Kosher salt
1/2 teaspoon pepper
1/2 teaspoon paprika
8 eggs
3/4 cup small curd cottage cheese
7 oz can chopped green chiles
2 cups grated Monterey Jack cheese (about 8 oz)

Directions:
1. Preheat the oven to 350°F. Generously butter the cups of a standard-sized mun pan with the softened butter.

2. In a medium bowl, mix together the flour, baking powder, salt, pepper, and paprika.

3. In a large bowl, whisk the eggs. Slowly add the dry ingredients to the egg mixture and whisk to combine.

4. Stir in the melted butter, cottage cheese, green chiles, and Monterey Jack cheese and continue stirring until the ingredients are incorporated.

5. Use a measuring cup to evenly distribute the egg mix into the 12 prepared cups of the mun pan.

6. Bake until set, about 20-25 min. Let the egg bake bites cool in the pan before removing. Eat while warm or store in the refrigerator for 3 days in an air-tight container, or wrap well and store in the freezer for up to two months.


Coq au Vin


Coq au Vin or "rooster in wine" is a traditional French peasant stew that became popular thanks to Julia Child's encouragement. While the original recipe might turn a tough old rooster into something delicious,  it's equally delightful with chicken thighs and or legs. Red wine, mushrooms, bacon, onions, and thyme all infuse wonderful flavors into this ultimate comfort food dish. A slow braising technique coaxes a mélange of easy ingredients into a dance of gustatory perfection!

Coq au Vin - Chicken in Wine
Serves 4 - 6

Ingredients:
1/2 lb bacon, diced
4 drumsticks, skin on and bone-in
4 chicken thighs, skin on and bone-in
1/2 teaspoon Kosher salt
1/2 teaspoon fresh ground pepper
2 tablespoons olive oil
1 onion, diced
2 cloves garlic, minced
4-5 large carrots, cut into 1-inch diagonal pieces
3 tablespoons flour
2 tablespoons tomato paste
1 tablespoon brandy
2 cups red wine (a good red wine like a pinot noir)
1 cup chicken broth
8-10 sprigs of fresh thyme
2 tablespoons butter
1/2 lb frozen small pearl onions
8 oz cremini mushrooms, sliced
Chopped parsley, for garnish

Directions:
1. Preheat the oven to 325 degrees F. 

2. Prepare the onions, garlic, and carrots.

3. In a large Dutch oven fry the bacon until crisp. Remove the bacon, and drain on a paper towel-lined plate.

4. Remove most of the bacon fat, leaving about 3-4 tablespoons in the Dutch oven.

5. Sprinkle the chicken pieces with Kosher salt and pepper. Sear the chicken legs and thighs on all sides in the Dutch oven until the skin is a crispy golden brown, then remove the chicken pieces.

6. Add 2 tablespoons of olive oil to the pot and sauté the diced onions until softened and translucent.

7. Add the garlic and carrots to the onion and sauté for a few more minutes until the garlic is fragrant.

8. Dust the vegetables with 3 tablespoons of flour and stir until coated. Cook for about 2 minutes.

9. Add the tomato paste and cook until fragrant, then add the brandy to the mixture. Cook the brandy down for a minute, then continue to deglaze the pan with the red wine. Add the chicken broth and stir until combined. Add the seared chicken pieces back to the pot with the cooked bacon, and the sprigs of thyme.

10. Cover the pot and place in the oven. Bake for 20-40 minutes or until the chicken is tender and cooked to 165 degrees F.

11. While the chicken is baking, prepare the mashed potatoes.

12. While the chicken bakes, prepare the pearl onions. In a skillet, sauté the pearl onions in two tablespoons butter until they are lightly golden brown on all sides.

13. Then, sauté the mushrooms in the same skillet, adding olive oil as needed, and cook until browned.

14. Add the cooked pearl onions and mushrooms to the Dutch oven. Carefully taste and season with additional salt and pepper, as needed. If needed, continue to simmer on the stovetop to thicken the sauce. The sauce will also thicken more as it cools.

15. Serve the Coq au Vin on a bed of mashed potatoes (or egg noodles or cauliflower rice), and garnish with fresh parsley.


Salted Caramels

 
Caramels_2020_v2_01.jpg

Everyone loves the captivating flavors of fresh homemade caramels! 

The little known secret? They are deceptively easy to make. Fresh, homemade caramels make great treats for sharing as little gifts in the holiday weeks ahead. IN THIS ISSUE, we show you, step-by-step, how to  master boutique caramels made in your own kitchen.

Handcrafted Caramels
Makes about 120 - 140 pieces, depending on size

Ingredients:
Vegetable oil (for coating pan)
3 cups heavy cream
3 cups granulated white sugar
1 cup brown sugar, packed
2 cups light corn syrup
1-1/2 teaspoons Kosher salt
1/2 cup (1 stick) unsalted butter
2 teaspoons vanilla extract

Directions:
1. Prepare a 9 x 13 rimmed pan prior to starting to cook. Oil the bottom and sides of the pan well using a tasteless vegetable oil, one that stays liquid at room temperature. Line the pan with a criss-cross of parchment paper cut to match the pan’s size with a little extra at the ends; avoid any wrinkles in the corners. Set aside.

2. Wipe the interior of a large saucepan or Dutch oven with a light coating of oil. Measure the heavy cream, sugars, light corn syrup and salt into the pan. Over medium-low heat, stir the ingredients together until well-combined and the sugar is dissolved.

3. Increase the heat to medium. Continue stirring until the cream-sugar mixture reaches a boil. Stop stirring. Using a brush dipped in warm water, wash down any sugar crystals that may have formed on the edge of the pan. Allow the mixture to cook, without stirring, until it reaches the firm-ball stage, around 248°F as measured on a candy thermometer clamped to the side of the pan. (If you do not have a candy thermometer, use a water test to check for the appropriate sugar stage. A drop (approximately 1/4 teaspoon) of caramel in cold water should form a firm ball, yet be pliable.)

4. Remove the caramel from heat, add the butter and vanilla stirring until melted and well-combined with the cream-sugar mixture. (Cutting the butter into half-inch cubes will help to efficiently melt and distribute this key ingredient.)

5. Carefully pour the caramel into the prepared, lined pan. Allow the caramel to set and cool to room temperature. This will take several hours or overnight. (For evenly sized caramels, make sure the pan is setting on a level surface.)

6. Once cooled, lift the sheet of caramel from the pan to a safe cutting surface. The caramel should retain its shape. Neaten the edges of the caramel to remove the rounded edges. Cut the caramel slab vertically and horizontally in desired sizes and shapes with a long-bladed cook’s knife. We suggest 1-1/4-inch by 1/2-inch pieces, or 1-inch squares. Wrap the pieces in nonstick wrap such as parchment paper. Store at cool room temperatures for up to 2-3 weeks.


Wine Poached Pears


When we want to embrace the beauty of the season, we turn to wine poached pears. THIS ISSUE features poached pears, served alongside vanilla bourbon mascarpone whipped cream. The subtle sweetness of this dish is exactly what we need to offset any holiday sugar highs, and nothing looks more striking.

Wine Poached Pears with Bourbon Mascarpone Whipped Cream
Makes about 4 poached pears

When we want to embrace the beauty of the season, we turn to wine poached pears. This recipe features poached pears, served alongside vanilla bourbon mascarpone whipped cream. The subtle sweetness of this dish is exactly what we need to offset any holiday sugar highs, and nothing looks more striking.

Ingredients:
4 Bosch pears, peeled with stem in-tact
1 bottle of dry red wine (750ml)
1 cup water
1/4 cup sugar
3 sticks of cinnamon
1/4 teaspoon cardamom
1 vanilla bean pod, halved and seeds scraped

Bourbon Mascarpone Whipped Cream Ingredients:
4 oz Mascarpone cheese
1/4 cup powdered sugar
1 cup cold heavy whipping cream
1 tablespoon bourbon
1/2 teaspoon vanilla extract

Directions:
1. Peel the pears, carefully leaving the stems in place.

2. Combine the red wine, water, sugar, cinnamon, cardamom, and vanilla bean seeds in a sauce pan and bring to a simmer. Stir until the sugar dissolves. Add the peeled pears making sure they are covered in the liquid. Simmer for about 40 minutes, or until the pears are tender and red, then chill the pears. Cook the wine mixture down into a sauce by simmering for an additional 45 minutes - 1 hour, or until your desired sauce consistency is reached.

3. Attach a chilled mixing bowl to a stand mixer with a whisk attachment. Add the mascarpone cheese and sugar and mix together on high until fully combined, about 3 minutes. Add the cream, bourbon, and vanilla extract, and mix ingredients together, starting on low speed, then increasing to a high speed, whipping until soft peaks form, roughly 8 minutes.

4. Serve immediately alongside the chilled pears, drizzle with the reduced wine sauce, and sprinkle with cinnamon.


Chocolate Orange Holiday Cookies


The flavors of chocolate and orange are a classic holiday duo for well-deserved reasons! In this recipe, rich dark chocolate is paired with light and bright citrus, resulting in a cookie that tastes so sophisticated, you’ll be happy you if you chose to make a double batch!

Chocolate Orange Cookies - Slice & Bake Makes about 24 cookies

Ingredients:
1 cup unsalted butter, softened
1/2 cup light brown sugar, packed
1-1/4 cups granulated sugar
1 large egg, room temperature
1 teaspoon pure almond extract
1 teaspoon freshly squeezed orange juice
2-1/4 cups all purpose flour
1/4 teaspoon salt
1/4 teaspoon cardamom
1 tablespoon orange zest (about 1 medium orange)
4 oz dark chocolate chunks, finely chopped, plus 16 oz dark chocolate chunks for melting
Coarse sugar for rolling, (such as sugar in the raw)
Flake sea salt
Additional orange zest for sprinkling

Directions:
1. In a stand mixer with a paddle attachment, beat the butter on medium speed until smooth. Add the sugars and beat on medium until light and fluffy. Add the egg and almond extract and beat on high speed until the ingredients are fully combined, roughly 5 minutes. Scrape down the sides and the bottom of the bowl with a spatula as needed. Add the orange juice and continue mixing for another minute. 

2. Sift the flour in a separate bowl and mix in the salt and cardamom. Slowly add the dry ingredients to the wet ingredients 1/2 cup at a time, mixing on low speed until fully incorporated. Fold in the orange zest and the 4 oz of finely chopped chocolate until evenly distributed. Gather and remove the dough from the mixer.

3. On a floured surface, divide the dough in half. Roll each half into a log, about 2-1/2 inches in diameter, and wrap in plastic wrap. Completely chill the dough (for at least 2 hrs, or for up to 1 week).

4. When ready to bake, preheat the oven to 350°F. Remove one of the dough logs from the refrigerator. Roll the logs in the coarse sugar and use a sharp, serrated knife to slice the log into individual rounds, roughly 1/2" thick. Place the cookies on a large cookie sheet, roughly 2" apart and bake for 12 minutes, or until the edges of cookies are just starting to brown. Cool on the cookie sheet for 2 minutes, then transfer to a cooling rack.

5. While the cookies are cooling, melt 16 oz of chocolate in a double boiler or in the microwave (careful not to burn the chocolate if microwaving!). Dip each cookie halfway into the chocolate to coat one half, and place the half-coated cookie on a parchment paper, or a silicone-lined baking sheet. While the chocolate is still warm, sprinkle the cookies with the flake salt and orange zest. Place the baking sheet in the refrigerator for about 30 minutes to allow the chocolate set.

Store the cookies in the refrigerator to ensure the chocolate stays set.